一、ELF 部分
1.1 types.h
1.1.1 typedef
这是 types.h 文件,主要是给一些基本的数据类型起一个简单一点的别名。
/*	$OpenBSD: types.h,v 1.12 1997/11/30 18:50:18 millert Exp $	*/
/*	$NetBSD: types.h,v 1.29 1996/11/15 22:48:25 jtc Exp $	*/

#ifndef _INC_TYPES_H_
#define _INC_TYPES_H_

#ifndef NULL
#define NULL ((void *) 0)
#endif /* !NULL */


typedef unsigned char            u_int8_t;
typedef short                     int16_t;
typedef unsigned short          u_int16_t;
typedef int                       int32_t;
typedef unsigned int            u_int32_t;
typedef long long                 int64_t;
typedef unsigned long long      u_int64_t;

typedef int32_t                 register_t;

typedef	unsigned char	u_char;
typedef	unsigned short	u_short;
typedef	unsigned int	u_int;
typedef	unsigned long	u_long;

typedef	u_int64_t	u_quad_t;	/* quads */
typedef	int64_t		quad_t;
typedef	quad_t *	qaddr_t;


#define MIN(_a, _b)	\
	({		\
		typeof(_a) __a = (_a);	\
		typeof(_b) __b = (_b);	\
		__a <= __b ? __a : __b;	\
	})

/* Static assert, for compile-time assertion checking */
#define static_assert(c) switch (c) case 0: case(c):

#define offsetof(type, member)  ((size_t)(&((type *)0)->member))

/* Rounding; only works for n = power of two */
#define ROUND(a, n)	(((((u_long)(a))+(n)-1)) & ~((n)-1))
#define ROUNDDOWN(a, n)	(((u_long)(a)) & ~((n)-1))


#endif /* !_INC_TYPES_H_ */
1.1.2 宏
文件中还有一些宏,对于这些宏
#define offsetof(type, member) ((size_t)(&((type *)0)->member))一个基本的无符号整数的C / C + +类型,它是sizeof操作符返回的结果类型,该类型的大小可选择。因此,它可以存储在理论上是可能的任何类型的数组的最大大小。
他的意思是
(type *)0将内存空间的 0 转换成需要的结构体指针(type *)0)->member利用这个结构体指针指向某个成员(&((type *)0)->member)取这个成员的地址((size_t)(&((type *)0)->member))将这个成员的地址转化成size_t类型
有如下示例
#include <stdio.h>

typedef struct node
{
    int a;
    double b;
    long long c;
    double d;
}node;


int main()
{
    printf("%d", ((size_t)(&((node *)0)-> c)));
}
这个会输出 16 (可能与我的电脑有关,理解即可)
下面这两个宏
/* Rounding; only works for n = power of two */
#define ROUND(a, n)	(((((u_long)(a))+(n)-1)) & ~((n)-1))
#define ROUNDDOWN(a, n)	(((u_long)(a)) & ~((n)-1))
会输出 a 在 n 的几倍数之间,比如下面
#include <stdio.h>
typedef	unsigned long	u_long;
#define ROUND(a, n)	(((((u_long)(a))+(n)-1)) & ~((n)-1))
#define ROUNDDOWN(a, n)	(((u_long)(a)) & ~((n)-1))

int main()
{
    printf("%d\t%d\n", ROUND(25, 4), ROUNDDOWN(25, 4));
}
会输出 28 24 因为 25 在 $4\times6 \sim 4\times 7 $ 之间。
具体的原理从这里看
#define ROUNDDOWN(a, n) (((u_long)(a)) & ~((n)-1))~((n)-1)是一串 1 以后有几个 0。比如 4 是 111……1100- 再拿这个数去与 a 进行与操作,就会让低位都变成 0
MIN 这个宏,写的也很复杂,有一篇文章解释这个
#define MIN(_a, _b)	\
	({		\
		typeof(_a) __a = (_a);	\
		typeof(_b) __b = (_b);	\
		__a <= __b ? __a : __b;	\
	})
https://www.cnblogs.com/sunyubo/archive/2010/04/09/2282179.html
关于 typeof,它可以取得变量的类型,或者表达式的类型。
对于这句话
typeof(_a) __a = (_a)就是声明一个叫做 __a 的变量,他的数据类型与 _a 相同。
1.2 kernel.h
/* This file defines standard ELF types, structures, and macros.
   Copyright (C) 1995, 1996, 1997, 1998, 1999 Free Software Foundation, Inc.
   This file is part of the GNU C Library.
   Contributed by Ian Lance Taylor <ian@cygnus.com>.

   The GNU C Library is free software; you can redistribute it and/or
   modify it under the terms of the GNU Library General Public License as
   published by the Free Software Foundation; either version 2 of the
   License, or (at your option) any later version.

   The GNU C Library is distributed in the hope that it will be useful,
   but WITHOUT ANY WARRANTY; without even the implied warranty of
   MERCHANTABILITY or FITNESS FOR A PARTICULAR PURPOSE.  See the GNU
   Library General Public License for more details.

   You should have received a copy of the GNU Library General Public
   License along with the GNU C Library; see the file COPYING.LIB.  If not,
   write to the Free Software Foundation, Inc., 59 Temple Place - Suite 330,
   Boston, MA 02111-1307, USA.  */

#ifndef _KER_ELF_H
#define _KER_ELF_H

/* ELF defination file from GNU C Library. We simplefied this
 * file for our lab, removing definations about ELF64, structs and
 * enums which we don't care.
 */

#include "types.h"

typedef u_int64_t               uint64_t;
typedef u_int32_t               uint32_t;
typedef u_int16_t               uint16_t;

/* Type for a 16-bit quantity.  */
typedef uint16_t Elf32_Half;

/* Types for signed and unsigned 32-bit quantities.  */
typedef uint32_t Elf32_Word;
typedef int32_t  Elf32_Sword;

/* Types for signed and unsigned 64-bit quantities.  */
typedef uint64_t Elf32_Xword;
typedef int64_t  Elf32_Sxword;

/* Type of addresses.  */
typedef uint32_t Elf32_Addr;

/* Type of file offsets.  */
typedef uint32_t Elf32_Off;

/* Type for section indices, which are 16-bit quantities.  */
typedef uint16_t Elf32_Section;

/* Type of symbol indices.  */
typedef uint32_t Elf32_Symndx;


/* The ELF file header.  This appears at the start of every ELF file.  */

#define EI_NIDENT (16)

typedef struct
{
        unsigned char   e_ident[EI_NIDENT];     /* Magic number and other info */
        Elf32_Half      e_type;                 /* Object file type */
        Elf32_Half      e_machine;              /* Architecture */
        Elf32_Word      e_version;              /* Object file version */
        Elf32_Addr      e_entry;                /* Entry point virtual address */
        Elf32_Off       e_phoff;                /* Program header table file offset */
        Elf32_Off       e_shoff;                /* Section header table file offset */
        Elf32_Word      e_flags;                /* Processor-specific flags */
        Elf32_Half      e_ehsize;               /* ELF header size in bytes */
        Elf32_Half      e_phentsize;            /* Program header table entry size */
        Elf32_Half      e_phnum;                /* Program header table entry count */
        Elf32_Half      e_shentsize;            /* Section header table entry size */
        Elf32_Half      e_shnum;                /* Section header table entry count */
        Elf32_Half      e_shstrndx;             /* Section header string table index */
} Elf32_Ehdr;

/* Fields in the e_ident array.  The EI_* macros are indices into the
   array.  The macros under each EI_* macro are the values the byte
   may have.  */

#define EI_MAG0         0               /* File identification byte 0 index */
#define ELFMAG0         0x7f            /* Magic number byte 0 */

#define EI_MAG1         1               /* File identification byte 1 index */
#define ELFMAG1         'E'             /* Magic number byte 1 */

#define EI_MAG2         2               /* File identification byte 2 index */
#define ELFMAG2         'L'             /* Magic number byte 2 */

#define EI_MAG3         3               /* File identification byte 3 index */
#define ELFMAG3         'F'             /* Magic number byte 3 */


/* Section segment header.  */

typedef struct{
        Elf32_Word sh_name;                 /* Section name */
        Elf32_Word sh_type;                 /* Section type */
        Elf32_Word sh_flags;                /* Section flags */
        Elf32_Addr sh_addr;                 /* Section addr */
        Elf32_Off  sh_offset;               /* Section offset */
        Elf32_Word sh_size;                 /* Section size */
        Elf32_Word sh_link;                 /* Section link */
        Elf32_Word sh_info;                 /* Section extra info */
        Elf32_Word sh_addralign;            /* Section alignment */
        Elf32_Word sh_entsize;              /* Section entry size */
}Elf32_Shdr;


/* Program segment header.  */

typedef struct {
        Elf32_Word      p_type;                 /* Segment type */
        Elf32_Off       p_offset;               /* Segment file offset */
        Elf32_Addr      p_vaddr;                /* Segment virtual address */
        Elf32_Addr      p_paddr;                /* Segment physical address */
        Elf32_Word      p_filesz;               /* Segment size in file */
        Elf32_Word      p_memsz;                /* Segment size in memory */
        Elf32_Word      p_flags;                /* Segment flags */
        Elf32_Word      p_align;                /* Segment alignment */
} Elf32_Phdr;


/* Legal values for p_type (segment type).  */

#define PT_NULL         0               /* Program header table entry unused */
#define PT_LOAD         1               /* Loadable program segment */
#define PT_DYNAMIC      2               /* Dynamic linking information */
#define PT_INTERP       3               /* Program interpreter */
#define PT_NOTE         4               /* Auxiliary information */
#define PT_SHLIB        5               /* Reserved */
#define PT_PHDR         6               /* Entry for header table itself */
#define PT_NUM          7               /* Number of defined types.  */
#define PT_LOOS         0x60000000      /* Start of OS-specific */
#define PT_HIOS         0x6fffffff      /* End of OS-specific */
#define PT_LOPROC       0x70000000      /* Start of processor-specific */
#define PT_HIPROC       0x7fffffff      /* End of processor-specific */

/* Legal values for p_flags (segment flags).  */

#define PF_X            (1 << 0)        /* Segment is executable */
#define PF_W            (1 << 1)        /* Segment is writable */
#define PF_R            (1 << 2)        /* Segment is readable */
#define PF_MASKPROC     0xf0000000      /* Processor-specific */

int readelf(u_char *binary,int size);

#endif /* kerelf.h */
1.2.1 ELF 文件的格式
在这份头文件中,主要定义了三种结构体,在说明之前,我们先介绍一下 ELF 文件的格式

这里还是要先说明一下,ELF 是有多种格式的,常见的就是可重定位文件、可执行文件和共享文件。对于可重定位文件,他的用途是作为链接器的输入,多个可重定位文件链接成可执行文件。所以他需要提供的是链接的信息。他的格式如下
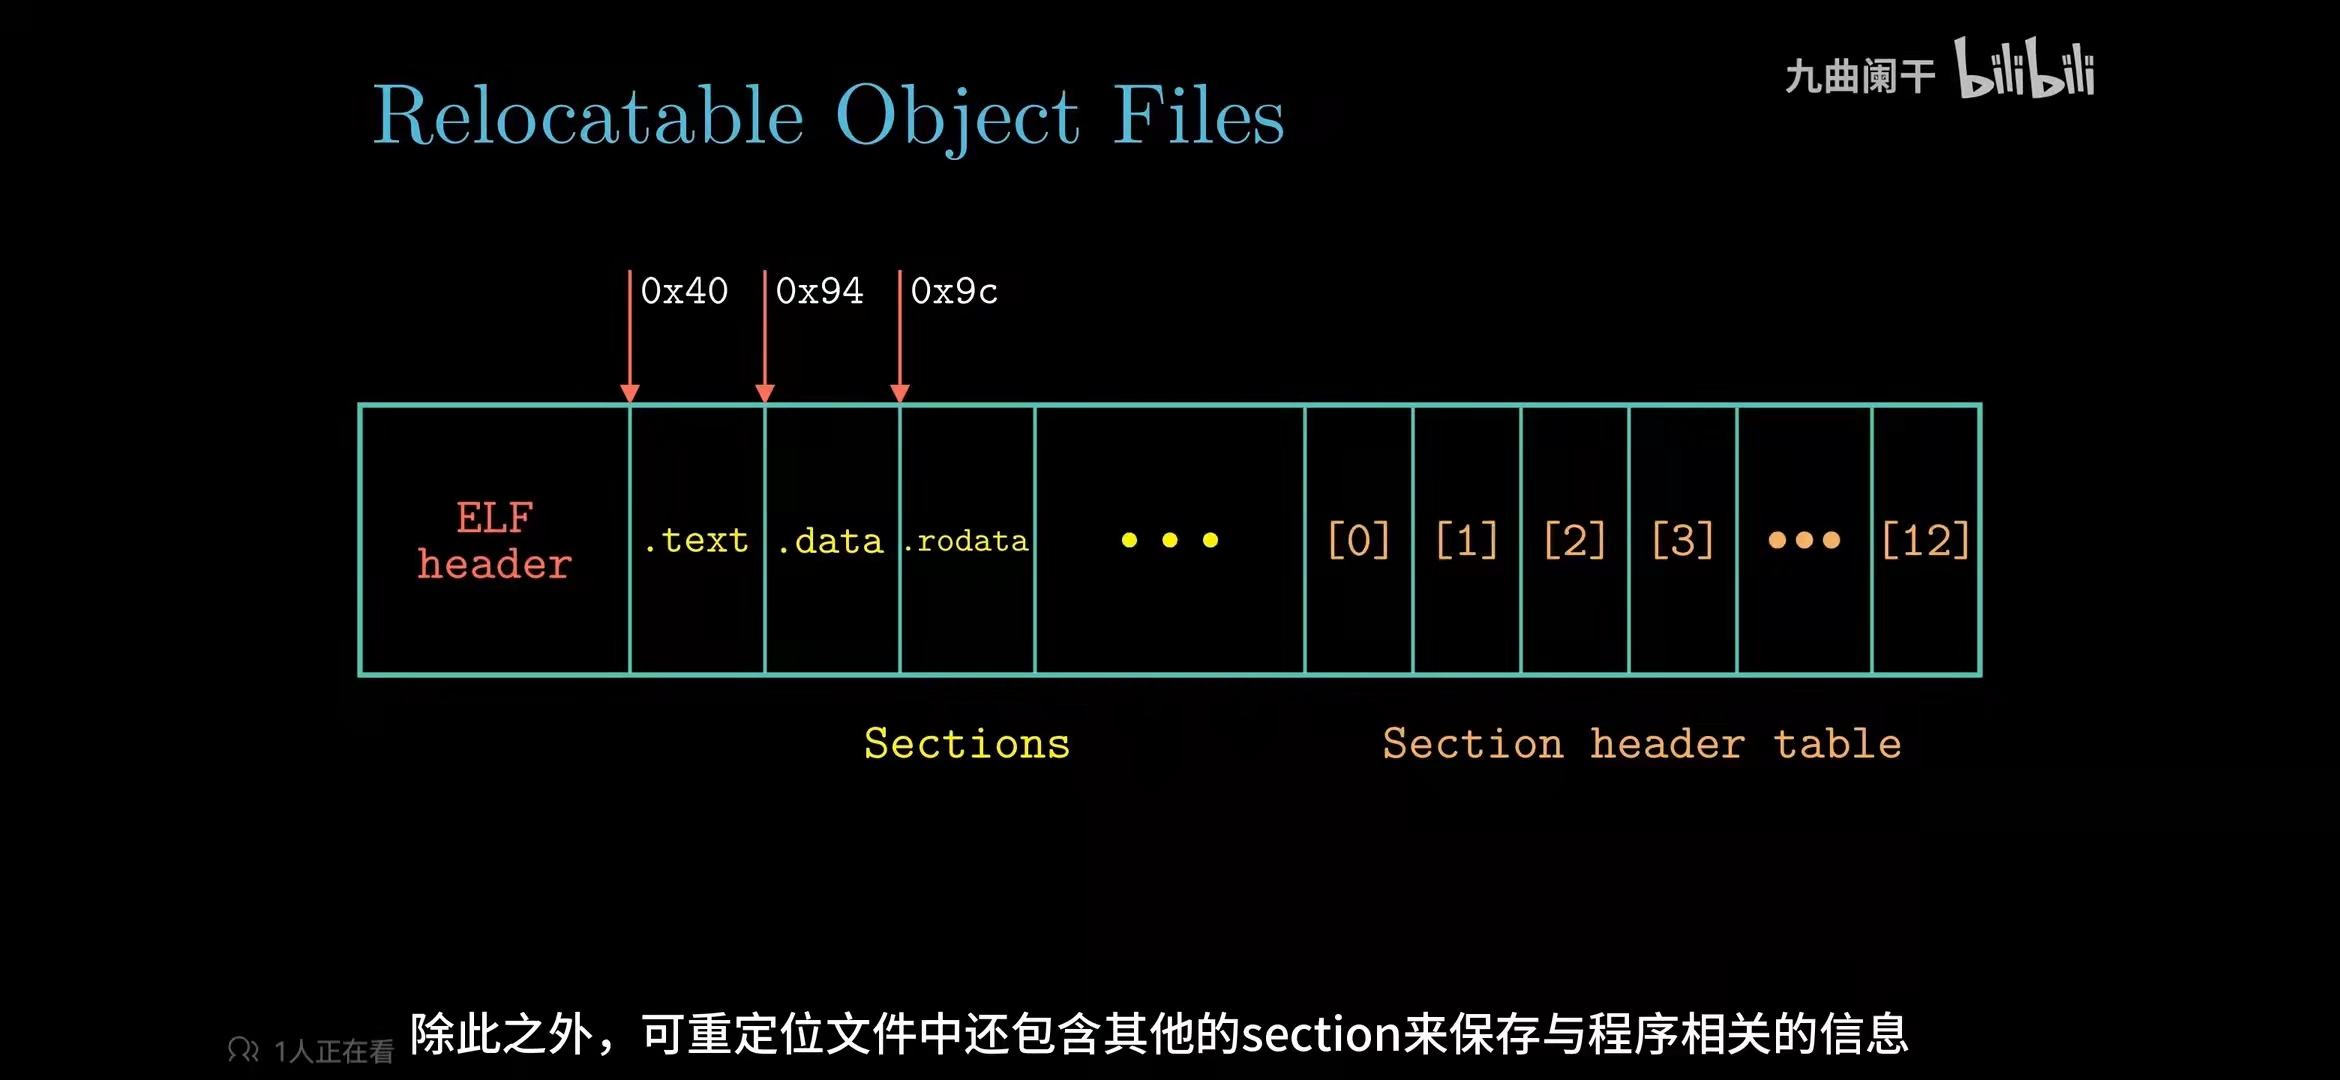
可以看到它由三个部分组成
- 头
- 各种节
- 节(section)头部表
而对于可执行文件,他的用途是作为加载器的输入,所以他需要提供的是将可执行文件映射到内存中的信息。所以他的格式如下
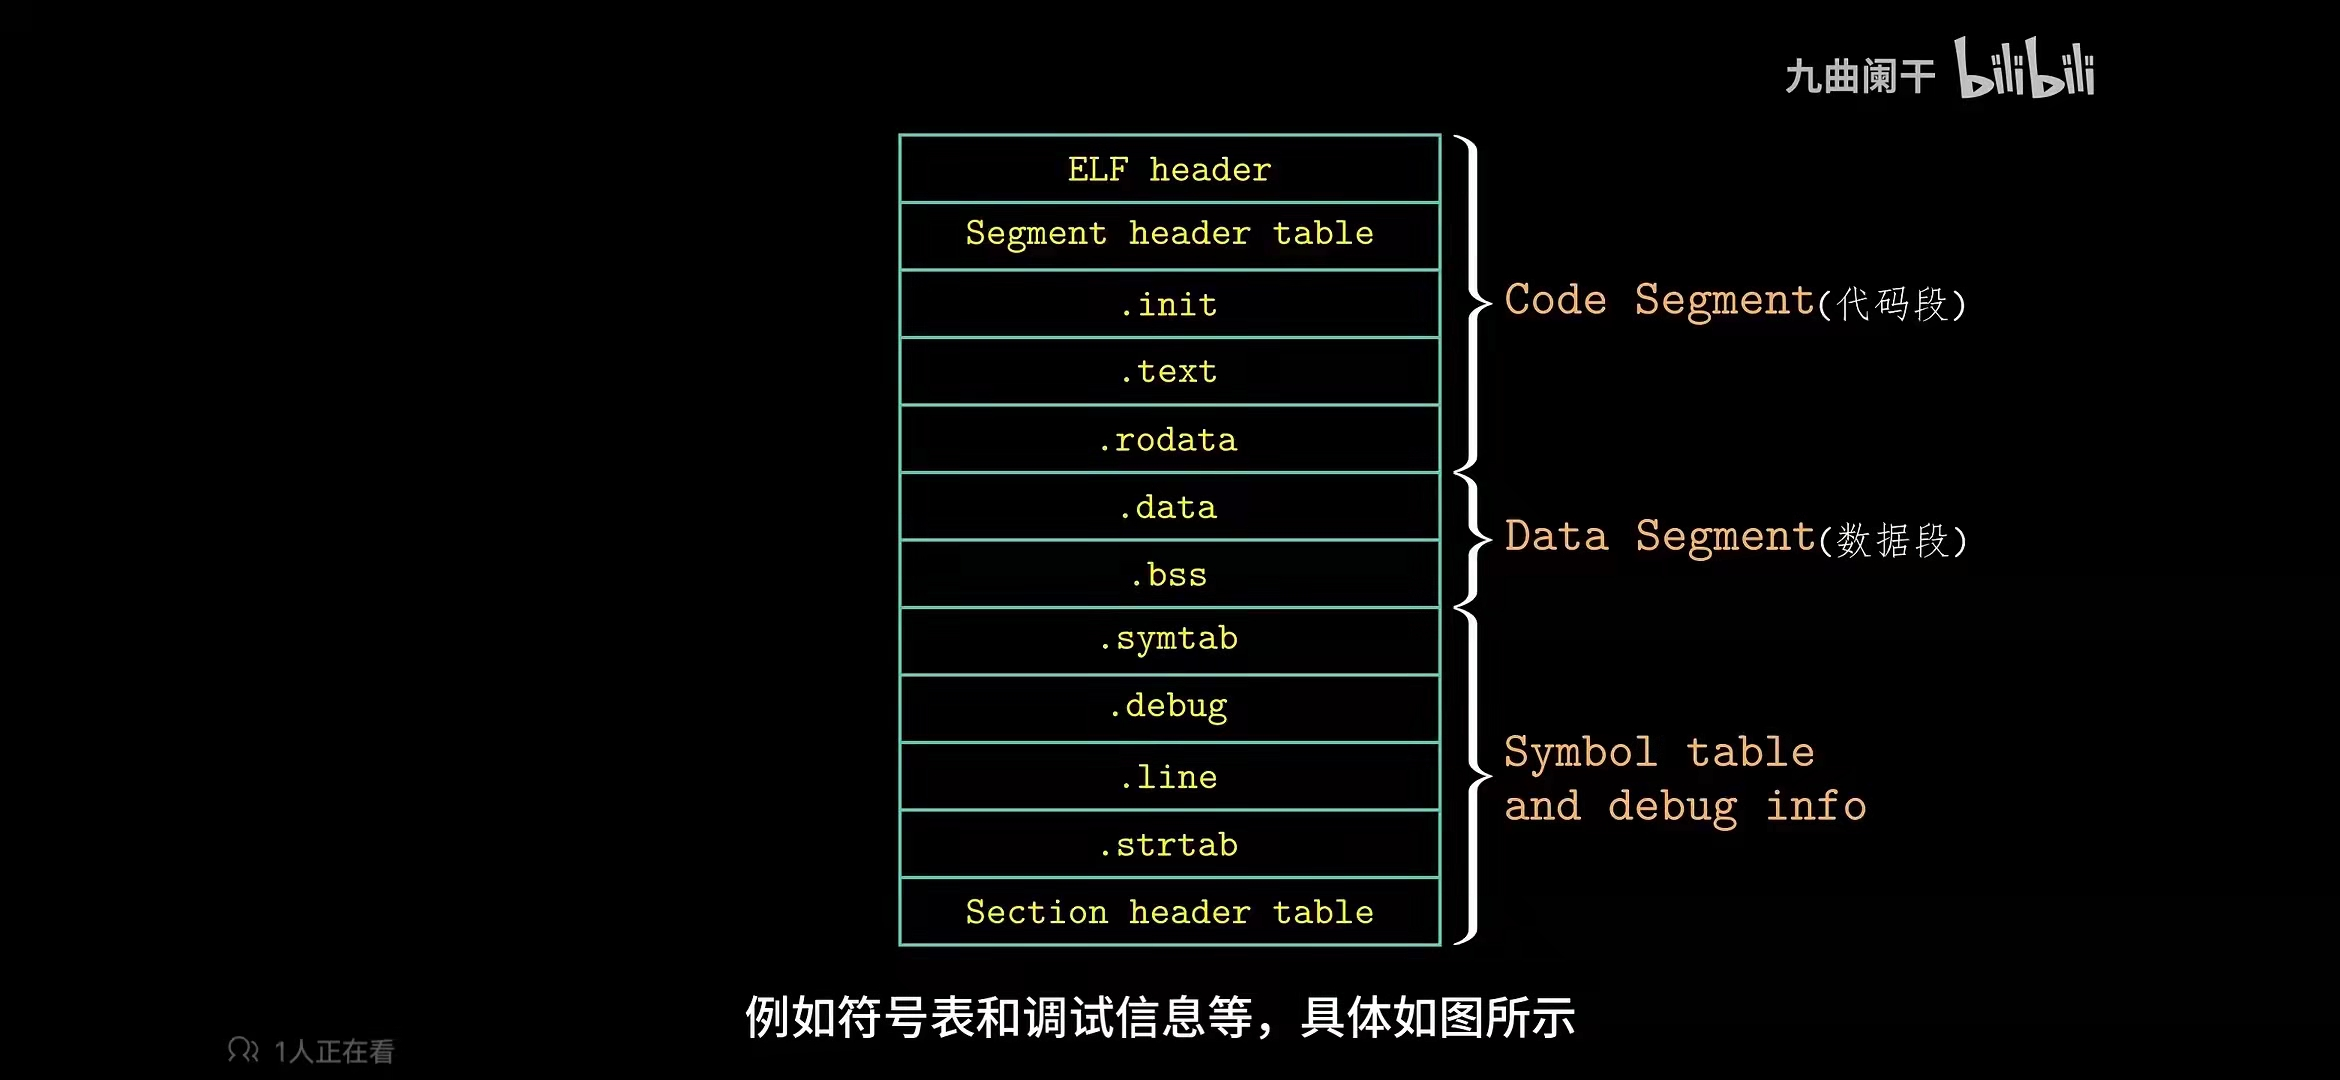
它由四个部分组成
- 头
- 段(segment)头部表:这是用来提供加载信息
- 段:可以看到这幅图里有两个段,但是有很多个节,相似属性的节组成了段
- 节头部表
关于节(section)和段(segment)的关系,有如下论述
Segment 称为段,是链接器根据目标文件中属性相同的多个 Section 合并后的 Section 集合,这个集合称为 Segment ,也就是段,链接器把目标文件链接成可执行文件,因此段最终诞生于可执行文件中。我们平时所说的可执行程序内存空间中的代码段和数据段就是指的Segment。Segment的信息需要在运行时刻使用。Section的信息需要在程序编译和链接的时候使用。
1.2.2 ELF 头
首先是 ELF 的头部,他包括了整个 ELF 文件的基本信息,也就是下面
typedef struct
{
        unsigned char   e_ident[EI_NIDENT];     /* Magic number and other info */
        Elf32_Half      e_type;                 /* Object file type */
        Elf32_Half      e_machine;              /* Architecture */
        Elf32_Word      e_version;              /* Object file version */
        Elf32_Addr      e_entry;                /* Entry point virtual address */
        Elf32_Off       e_phoff;                /* Program header table file offset */
        Elf32_Off       e_shoff;                /* Section header table file offset */
        Elf32_Word      e_flags;                /* Processor-specific flags */
        Elf32_Half      e_ehsize;               /* ELF header size in bytes */
        Elf32_Half      e_phentsize;            /* Program header table entry size */
        Elf32_Half      e_phnum;                /* Program header table entry count */
        Elf32_Half      e_shentsize;            /* Section header table entry size */
        Elf32_Half      e_shnum;                /* Section header table entry count */
        Elf32_Half      e_shstrndx;             /* Section header string table index */
} Elf32_Ehdr;
在后面用到的,有最开始的魔数
unsigned char e_ident[EI_NIDENT]; /* Magic number and other info */可以看到,在这份头文件中专门为这个数组定义了一些宏
/* Fields in the e_ident array.  The EI_* macros are indices into the
   array.  The macros under each EI_* macro are the values the byte
   may have.  */

#define EI_MAG0         0               /* File identification byte 0 index */
#define ELFMAG0         0x7f            /* Magic number byte 0 */

#define EI_MAG1         1               /* File identification byte 1 index */
#define ELFMAG1         'E'             /* Magic number byte 1 */

#define EI_MAG2         2               /* File identification byte 2 index */
#define ELFMAG2         'L'             /* Magic number byte 2 */

#define EI_MAG3         3               /* File identification byte 3 index */
#define ELFMAG3         'F'             /* Magic number byte 3 */
在 e_ident 中除了魔数标识以外,还有一些属性,如下图
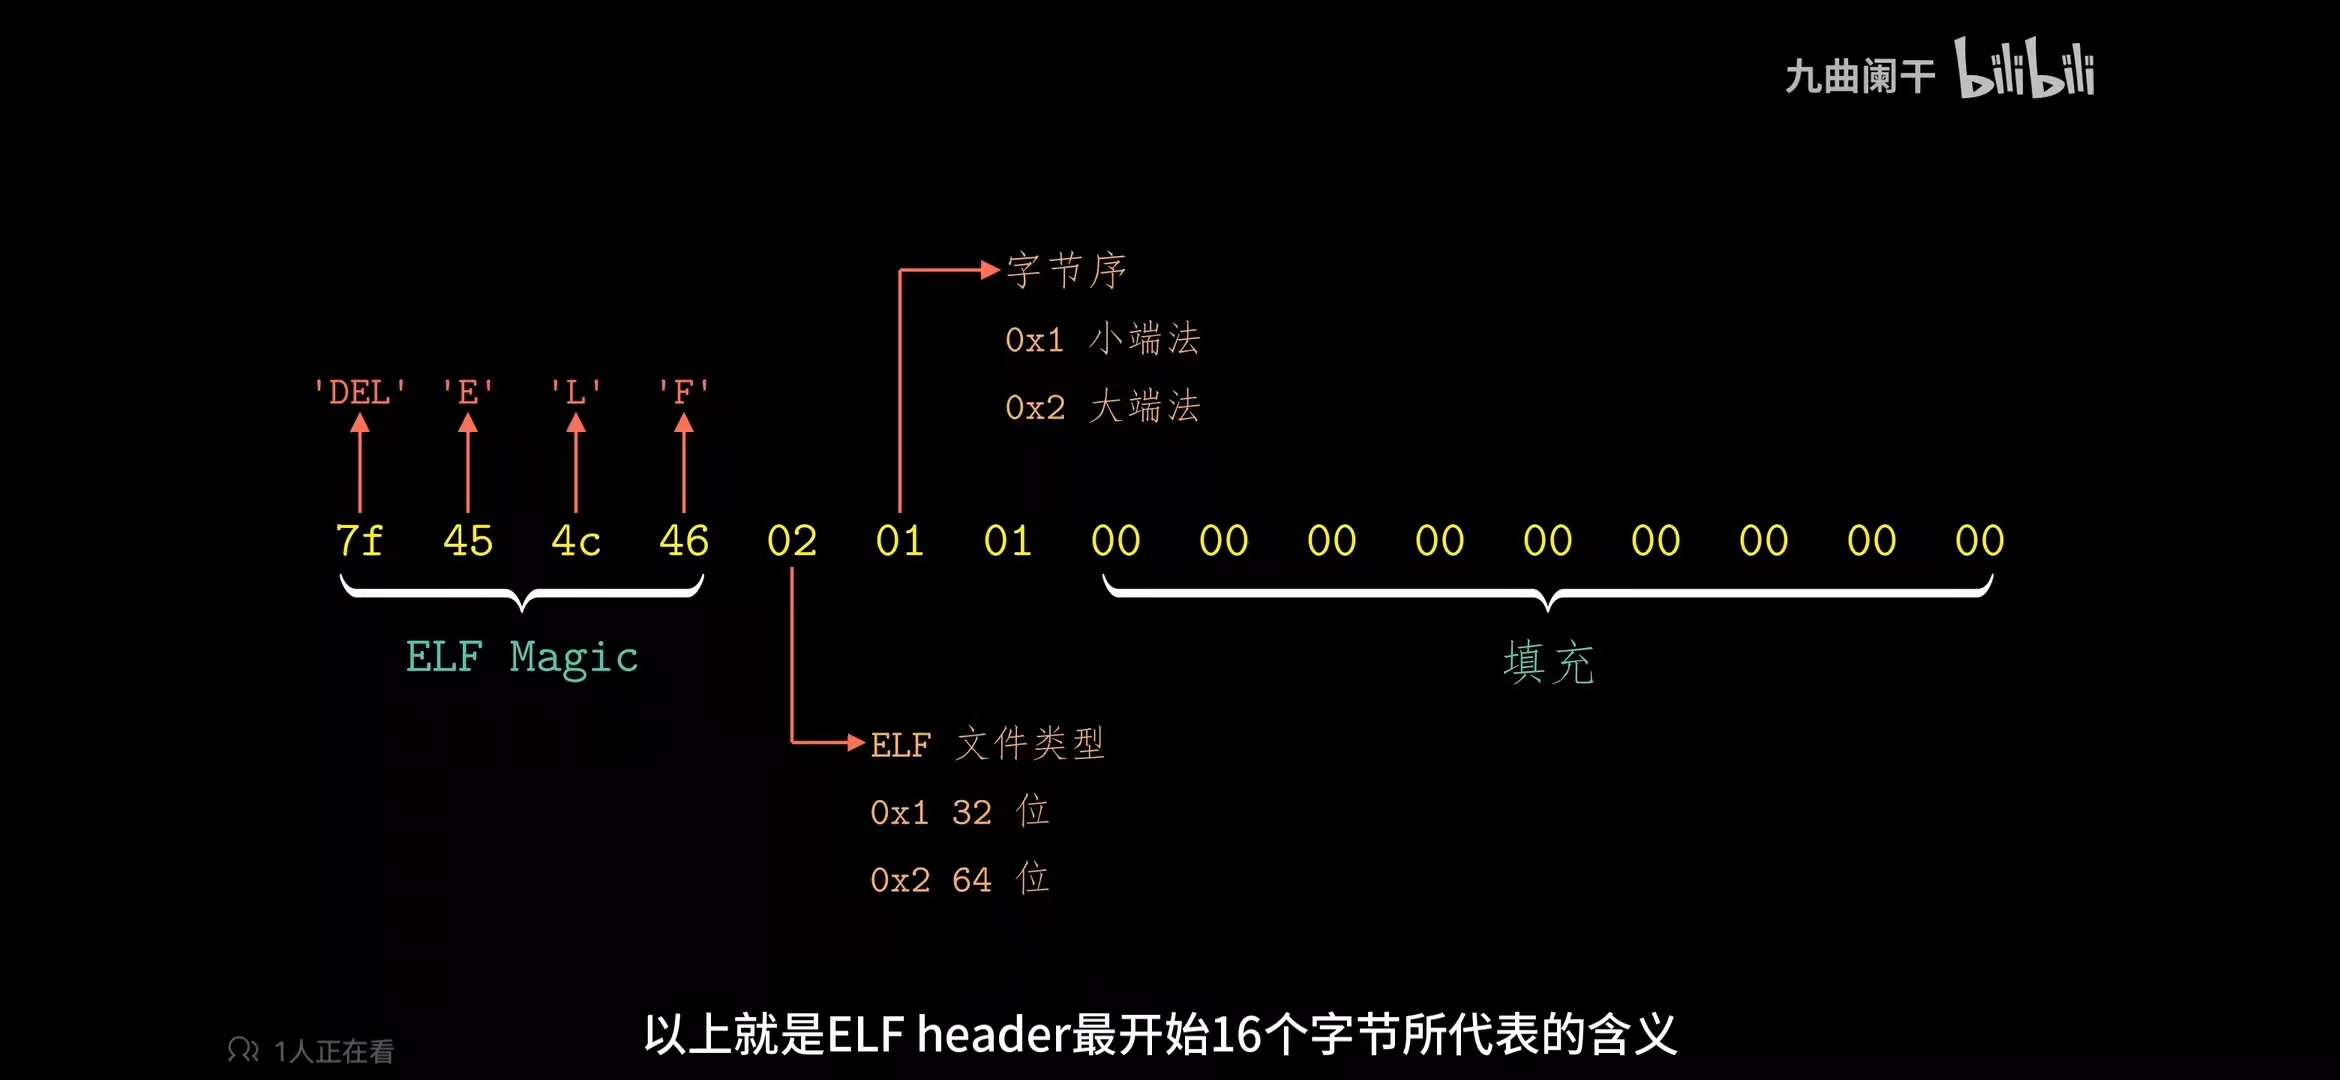
ELF 文件的类型,在这里的定义
Elf32_Half e_type; /* Object file type */占两个字节,有如下对应
| 名称 | 取值 | 含义 |
|---|---|---|
| ET_NONE | 0x0000 | 未知目标文件格式 |
| ET_ERL | 0x0001 | 可重定位文件 |
| ET_EXEC | 0x0002 | 可执行文件 |
| ET_DYN | 0x0003 | 共享目标文件 |
| ET_CORE | 0x0004 | Core文件(转储格式) |
| ET_LOPROC | 0xff00 | 特定处理器文件 |
| ET_HIPROC | 0xffff | 特定处理器文件 |
该程序的入口(这个应该只有可执行文件的头部有),在这里定义
Elf32_Addr e_entry; /* Entry point virtual address */段头部表的地址,可以从这里读出
Elf32_Off e_phoff; /* Program header table file offset */这是 Program header table (即段头部表)相对于 ELF 头首地址的偏移量。说白了也可以看做 ELF 头的大小,因为段头部表紧紧挨着 ELF 头,偏移量就是 ELF 头的大小。也就是这个值
Elf32_Half e_ehsize; /* ELF header size in bytes */节头部表的地址,可以从这里读出
Elf32_Off e_shoff; /* Section header table file offset */其他的表项我们在后面介绍段头部表和节头部表的时候介绍。
1.2.3 段头部表
首先最最重要的,一定要意识到,这个结构体,是一个段头部表的一个条目(即一个表项),而不是一个一整个段头部表
/* Program segment header.  */

typedef struct {
        Elf32_Word      p_type;                 /* Segment type */
        Elf32_Off       p_offset;               /* Segment file offset */
        Elf32_Addr      p_vaddr;                /* Segment virtual address */
        Elf32_Addr      p_paddr;                /* Segment physical address */
        Elf32_Word      p_filesz;               /* Segment size in file */
        Elf32_Word      p_memsz;                /* Segment size in memory */
        Elf32_Word      p_flags;                /* Segment flags */
        Elf32_Word      p_align;                /* Segment alignment */
} Elf32_Phdr;
对于一个可执行文件,会拥有多个这样的结构体,示例如下
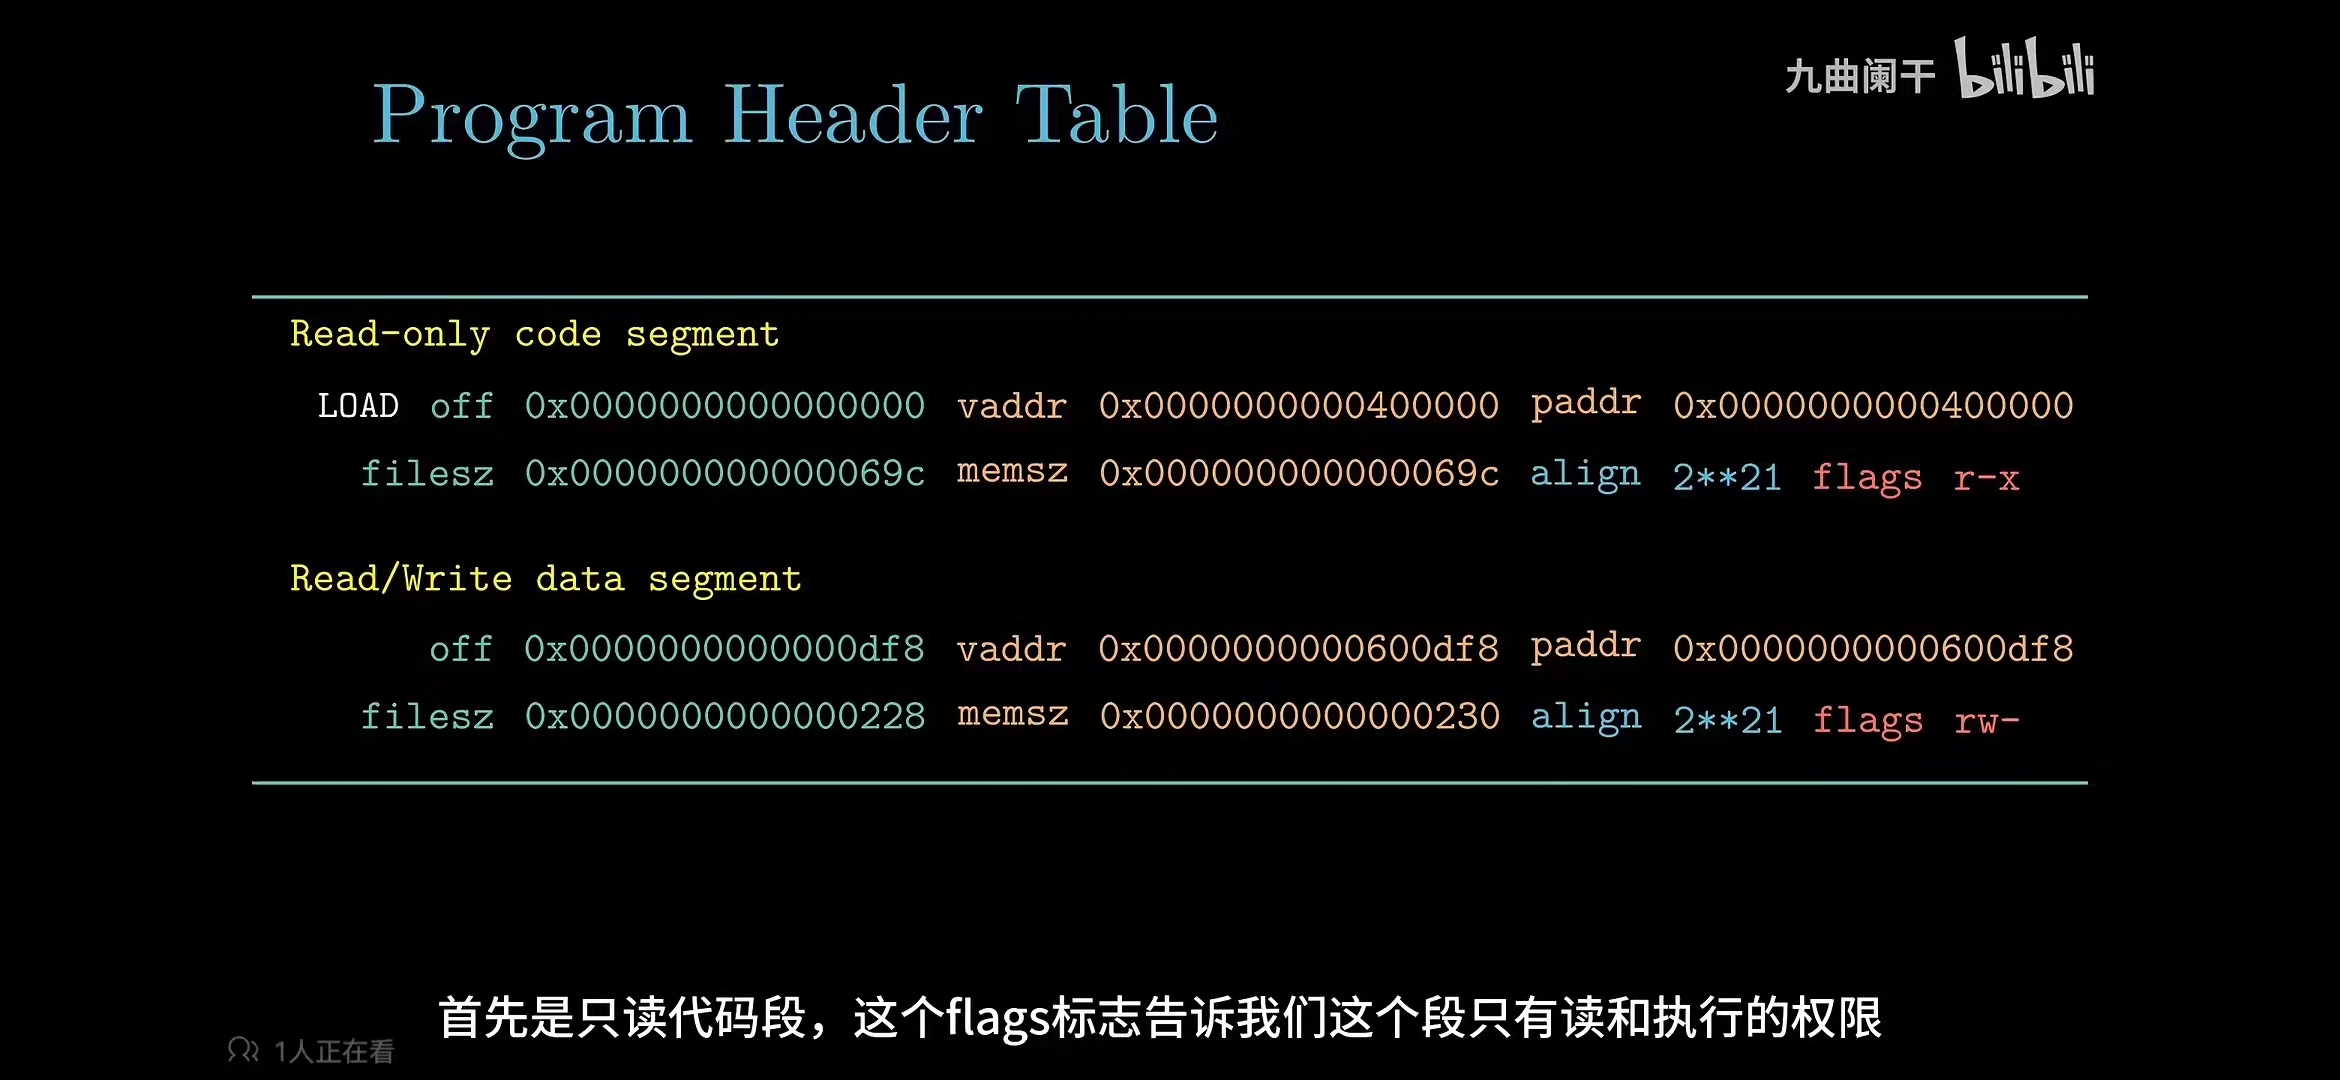
这就是具有两个结构体,分为只读段和读写段,每个段都有一个上面这样的结构体来描述这个段的性质。
段头部表里面有两个重要的属性
Elf32_Word      p_filesz;               /* Segment size in file */
Elf32_Word      p_memsz;                /* Segment size in memory */
FileSiz 代表该段的数据在文件中的长度。MemSiz 代表该段的数据在内存中所应当占的大小。FileSiz 会小于等于 MemSize,因为有些段中的某些部分是不会在文件中记录的,比如说数据段的 bss 节,在可执行文件中也只记录它需要占用内存(MemSiz), 但在文件中却没有相应的数据(因为它并不需要初始化成特定数据)。
在 ELF 头的表项中,也记录了一些这个表的属性,注释写的很明白,就不细说了
Elf32_Half      e_phentsize;            /* Program header table entry size */
Elf32_Half      e_phnum;                /* Program header table entry count */
1.2.4 节头部表
跟上面的 Elf32_Phdr 的类似,这个结构体也就是一个条目,这个条目里描述了某一节(some section)链接的是时候需要的信息,结构体如下
/* Section segment header.  */

typedef struct{
        Elf32_Word sh_name;                 /* Section name */
        Elf32_Word sh_type;                 /* Section type */
        Elf32_Word sh_flags;                /* Section flags */
        Elf32_Addr sh_addr;                 /* Section addr */
        Elf32_Off  sh_offset;               /* Section offset */
        Elf32_Word sh_size;                 /* Section size */
        Elf32_Word sh_link;                 /* Section link */
        Elf32_Word sh_info;                 /* Section extra info */
        Elf32_Word sh_addralign;            /* Section alignment */
        Elf32_Word sh_entsize;              /* Section entry size */
}Elf32_Shdr;
一个节头部表中有很多个这样的结构体。
在 ELF 头的表项中,也记录了一些这个表的属性。
Elf32_Half      e_shentsize;            /* Section header table entry size */
Elf32_Half      e_shnum;                /* Section header table entry count */
1.3 main.c, readelf.c
1.3.1 文件操作
因为涉及了一些文件操作,所以复习一下
FILE* fp; // 声明一个文件指针,或者称为文件流
FILE* fopen(const char *filename, const char *mode); // 打开一个文件,mode 指定了打开的模式
int fseek(FILE *stream, long offset, int fromwhere); /* 将文件指针重新定位,offset 是偏移量,fromwhere有SEEK_END 尾部,SEEK_SET 头部*/
long ftell(FILE *stream); // 用于得到文件位置指针当前位置相对于文件首的偏移字节数。
size_t fread( void *restrict buffer, size_t size, size_t count, FILE *restrict stream ); /* 将文件读入到一个数组中,restrict buffer 是数组,size 是每个对象的大小(单位是字节),count 是要读取的对象个数,stream 是输入流  */
int fgetc(FILE *stream); // 从stream指向的文件中读取一个字符,读取一个字节后,光标位置后移一个字节
int fclose( FILE *fp ); // 关闭一个流,如果流成功关闭,fclose 返回 0,否则返回EOF(-1)
FILE *freopen(const char *filename, const char *mode, FILE *stream) /*把一个新的文件名 filename 与给定的打开的流 stream 关联,同时关闭流中的旧文件 *、
1.3.2 代码注释
main.c:
#include <stdio.h>
#include <stdlib.h>

extern int readelf(u_char* binary, int size);
/*
        overview: input a elf format file name from control line, call the readelf function
                  to parse it.
        params:
                argc: the number of parameters
                argv: array of parameters, argv[1] shuold be the file name.

*/

int main(int argc,char *argv[])
{
    FILE* fp;
    int fsize;
    unsigned char *p;

	// argc < 2 说明只输入了 readelf,没有输入文件名
    if (argc < 2)
    {
        printf("Please input the filename.\n");
        return 0;
    }
    // 没有打开文件
    if ((fp = fopen(argv[1], "rb")) == NULL)
    {
        printf("File not found\n");
        return 0;
    }

    // 将文件指针定位到文件的尾部
    fseek(fp, 0L, SEEK_END);
    // 求出文件的大小
    fsize = ftell(fp);
    // 动态分配一个数组,用来存 ELF 二进制文件
    p = (u_char *)malloc(fsize + 1);
    // 没有分配成功的时候,就结束整个 main
    if (p == NULL)
    {
            fclose(fp);
            return 0;
    }

    // 将文件指针定位到文件的头部
    fseek(fp, 0L, SEEK_SET);
    // 按 1 字节从 fp 中读取 fsize 个数据到 p 中
    fread(p, fsize, 1, fp);
    // 尾端置 0
    p[fsize] = 0;
	// 调用函数
    readelf(p,fsize);
    return 0;
}readelf.c:
#include "kerelf.h"
#include <stdio.h>
/* Overview:
 *   Check whether it is a ELF file.
 *
 * Pre-Condition:
 *   binary must longer than 4 byte.
 *
 * Post-Condition:
 *   Return 0 if `binary` isn't an elf. Otherwise
 * return 1.
 */
// 这里就是在检验魔数
int is_elf_format(u_char *binary)
{
    Elf32_Ehdr *ehdr = (Elf32_Ehdr *)binary;
    if (ehdr->e_ident[EI_MAG0] == ELFMAG0 &&
        ehdr->e_ident[EI_MAG1] == ELFMAG1 &&
        ehdr->e_ident[EI_MAG2] == ELFMAG2 &&
        ehdr->e_ident[EI_MAG3] == ELFMAG3) {
        return 1;
    }

    return 0;
}

/* Overview:
 *   read an elf format binary file. get ELF's information
 *
 * Pre-Condition:
 *   `binary` can't be NULL and `size` is the size of binary.
 *
 * Post-Condition:
 *   Return 0 if success. Otherwise return < 0.
 *   If success, output address of every section in ELF.
 */

/*
    Exercise 1.2. Please complete func "readelf".
*/
int readelf(u_char *binary, int size)
{
    Elf32_Ehdr *ehdr = (Elf32_Ehdr *)binary;

    int Nr;

    Elf32_Shdr *shdr = NULL;

    u_char *ptr_sh_table = NULL;
    Elf32_Half sh_entry_count;
    Elf32_Half sh_entry_size;


    // check whether `binary` is a ELF file. size < 4 说明连 4 个魔数都没有凑齐
    if (size < 4 || !is_elf_format(binary))
    {
        printf("not a standard elf format\n");
        return 0;
    }

    // get section table addr, section header number and section header size.

    // hint: section number starts at 0.
    return 0;
}
重点片段:
首先算出节头部表的地址,利用的是指针基地址(binary)加上偏移量(在 ELF 头中记录):
对节头部表进行数组操作,并打印(打印序号和地址)
当然,还有更加优雅的写法,即写成数组(跟表的格式更加吻合)。
1.3.3 大小端
因为解析的是二进制文件,所以确定大小端是一个很重要的事情。
当我使用我自己的 readelf 程序时去解析 vmlinux 时,会出现报错
Segmentation fault (core dumped)上网查了以后说应该是指针之类的错误。然后按照题目要求调用原有的 readelf,发现 vmlinux 是大端的,而 testELF 是小端的,所以没有办法解析。
这是 vmlinux 的解析信息
ELF Header:
  Magic:   7f 45 4c 46 01 02 01 00 00 00 00 00 00 00 00 00
  Class:                             ELF32
  Data:                              2's complement, big endian
  Version:                           1 (current)
  OS/ABI:                            UNIX - System V
  ABI Version:                       0
  Type:                              EXEC (Executable file)
  Machine:                           MIPS R3000
  Version:                           0x1
  Entry point address:               0x0
  Start of program headers:          52 (bytes into file)
  Start of section headers:          36652 (bytes into file)
  Flags:                             0x1001, noreorder, o32, mips1
  Size of this header:               52 (bytes)
  Size of program headers:           32 (bytes)
  Number of program headers:         2
  Size of section headers:           40 (bytes)
  Number of section headers:         14
  Section header string table index: 11
这是 testELF 的解析信息
ELF Header:
  Magic:   7f 45 4c 46 01 01 01 00 00 00 00 00 00 00 00 00
  Class:                             ELF32
  Data:                              2's complement, little endian
  Version:                           1 (current)
  OS/ABI:                            UNIX - System V
  ABI Version:                       0
  Type:                              EXEC (Executable file)
  Machine:                           Intel 80386
  Version:                           0x1
  Entry point address:               0x8048490
  Start of program headers:          52 (bytes into file)
  Start of section headers:          4440 (bytes into file)
  Flags:                             0x0
  Size of this header:               52 (bytes)
  Size of program headers:           32 (bytes)
  Number of program headers:         9
  Size of section headers:           40 (bytes)
  Number of section headers:         30
  Section header string table index: 27
二、汇编部分
2.1 asm.h
在 \include\asm\ 下,源码如下
#include "regdef.h"
#include "cp0regdef.h"

/*
 * LEAF - declare leaf routine
 */
#define LEAF(symbol)                                    \
                .globl  symbol;                         \
                .align  2;                              \
                .type   symbol,@function;               \
                .ent    symbol,0;                       \
symbol:         .frame  sp,0,ra

/*
 * NESTED - declare nested routine entry point
 */
#define NESTED(symbol, framesize, rpc)                  \
                .globl  symbol;                         \
                .align  2;                              \
                .type   symbol,@function;               \
                .ent    symbol,0;                       \
symbol:         .frame  sp, framesize, rpc


/*
 * END - mark end of function
 */
#define END(function)                                   \
                .end    function;                       \
                .size   function,.-function

#define	EXPORT(symbol)                                  \
							.globl	symbol; 				\
				symbol:

#define FEXPORT(symbol)					\
						.globl	symbol; 			\
						.type	symbol,@function;		\
				symbol:
2.2.1 栈和栈帧
我们都知道,汇编一旦发生函数调用的时候,一般就会借助内存中的栈结构,我们在学计组的时候,学习到了栈的操作是通过 $sp 寄存器实现的。当栈指针减小的时候,就相当于分配出一块栈空间。反之,则是栈消减了。我们每调用一个函数(其实不严谨,应该是每一个调用别的函数的函数,即非叶子函数),都需要在栈上开辟出一个栈空间来辅助函数的使用(在调用子函数的时候寄存器需要保存)。其实到这里跟我们计组知识是吻合的。
但是这样不利于回溯,栈在我们眼里是同质性的,根本分不清子函数和母函数的界限在哪里。所以我们又规定了一个寄存器 $fp,这个寄存器会指向栈帧的第一个字,这样我们就可以回溯了,具体的示意图如下:

2.2.2 声明函数格式
我们都知道,汇编的函数是用标签声明的,函数的结尾会有一个 jr $ra 。就像这样
sum:
#入栈过程
sw $t0, 0($sp)
addi $sp, $sp, -4
#传参过程
move $t0, $a0
move $t1, $a1
#函数过程
add $v0 $t0, $t1
#出栈过程
addi $sp, $sp, 4
lw $t0, 0($sp)
#return
jr $ra但是这个依然是很朴素的,因为这个对于编译器很混乱,因为标签不止可以干表示函数的事情,编译器识别不出来这个函数。所以这要求我们写汇编函数的时候对于函数声明这件事情更加复杂一点。
这个函数声明的格式,是在这个文件中定义的,他希望我们写一个函数的时候,呈现这种格式(以上面那个函数为例)
LEAF(sum)
    #入栈过程
    sw $t0, 0($sp)
    addi $sp, $sp, -4
    #传参过程
    move $t0, $a0
    move $t1, $a1
    #函数过程
    add $v0 $t0, $t1
    #出栈过程
    addi $sp, $sp, 4
    lw $t0, 0($sp)
    #return
    jr $ra
END(sum)
2.2.3 分析声明代码
首先复习一下基础知识:
伪指令(Assembler Directives)
这种东西是用来指导汇编器工作的(汇编器的作用是把汇编语言翻译成机器码),有了伪指令,我们可以声明全局标签,声明宏,设置异常数据段和代码段。
换行与一行多语句
C 语言可以通过
\将本来在一行中的内容拆成多行,依然保持输出的效果,所以LEAF的意思大约是
#define LEAF(symbol) .globl symbol; .align 2; .type symbol,@function; .ent symbol,0; symbol: .frame sp,0,ra 同时,如果是汇编语言,如果要在一行中出现多个语句,那么急必须使用 ; 进行分割。
我们先看 LEAF
/*
 * LEAF - declare leaf routine
 */
#define LEAF(symbol)                                    \
                .globl  symbol;                         \
                .align  2;                              \
                .type   symbol,@function;               \
                .ent    symbol,0;                       \
symbol:         .frame  sp,0,ra
这句话的意思就是定义了一个全局(是对链接器而言的)的符号 symbol
.globl symbol;这句话的意思是按照 2 字节的方式填充边界,.align 相当于一个对齐操作符,底下这句话的意思就是按照 $2^2$ 个字节进行对齐,注意只对其后面那一个变量
.align 2; 这句话定义了一个函数,.type 的格式:.type <name> @<type>
.type symbol,@function; 这条语句说明了函数的开始,但是后面的参数 0 我不知道啥意思
.ent symbol,0; 下面这条语句才是我们最熟悉的函数标签
symbol: .frame sp,0,ra但是后面还是跟了个 .frame ,他的三个参数分别为栈指针,栈帧大小(因为叶子函数没有回溯的必要,所以不需要分配栈帧?),返回寄存器,存储返回地址。
然后再看 NESTED
/*
 * NESTED - declare nested routine entry point
 */
#define NESTED(symbol, framesize, rpc)                  \
                .globl  symbol;                         \
                .align  2;                              \
                .type   symbol,@function;               \
                .ent    symbol,0;                       \
symbol:         .frame  sp, framesize, rpc
会发现与 LEAF 基本上一样,唯一的区别是最后一句
symbol: .frame sp, framesize, rpc显然母函数是需要栈帧的。但是返回寄存器变得可调了,我也不知道为啥,可能用的多了?
最后看 end
#define END(function)                                   \
                .end    function;                       \
                .size   function,.-function
这句是函数的结尾
.end function;这句不会,摆了
.size function,.-function2.2.4 引入
asm.h 还涉及一个引入问题 extern,挺简单的,就不说了
#define	EXPORT(symbol)                                  \
							.globl	symbol; 				\
				symbol:

#define FEXPORT(symbol)					\
						.globl	symbol; 			\
						.type	symbol,@function;		\
				symbol:
2.2 cp0regdef.h regdef.h
这两个挺简单的,就是给寄存器起别名
cp0regdef.h
#ifndef _cp0regdef_h_
#define _cp0regdef_h_

#define CP0_INDEX $0
#define CP0_RANDOM $1
#define CP0_ENTRYLO0 $2
#define CP0_ENTRYLO1 $3
#define CP0_CONTEXT $4
#define CP0_PAGEMASK $5
#define CP0_WIRED $6
#define CP0_BADVADDR $8
#define CP0_COUNT $9
#define CP0_ENTRYHI $10
#define CP0_COMPARE $11
#define CP0_STATUS $12
#define CP0_CAUSE $13
#define CP0_EPC $14
#define CP0_PRID $15
#define CP0_CONFIG $16
#define CP0_LLADDR $17
#define CP0_WATCHLO $18
#define CP0_WATCHHI $19
#define CP0_XCONTEXT $20
#define CP0_FRAMEMASK $21
#define CP0_DIAGNOSTIC $22
#define CP0_PERFORMANCE $25
#define CP0_ECC $26
#define CP0_CACHEERR $27
#define CP0_TAGLO $28
#define CP0_TAGHI $29
#define CP0_ERROREPC $30


#define STATUSF_IP4 0x1000
#define STATUS_CU0 0x10000000
#define	STATUS_KUC 0x2
#endifregdef.h:
#ifndef __ASM_MIPS_REGDEF_H
#define __ASM_MIPS_REGDEF_H

/*
 * Symbolic register names for 32 bit ABI
 */
#define zero    $0      /* wired zero */
#define AT      $1      /* assembler temp  - uppercase because of ".set at" */
#define v0      $2      /* return value */
#define v1      $3
#define a0      $4      /* argument registers */
#define a1      $5
#define a2      $6
#define a3      $7
#define t0      $8      /* caller saved */
#define t1      $9
#define t2      $10
#define t3      $11
#define t4      $12
#define t5      $13
#define t6      $14
#define t7      $15
#define s0      $16     /* callee saved */
#define s1      $17
#define s2      $18
#define s3      $19
#define s4      $20
#define s5      $21
#define s6      $22
#define s7      $23
#define t8      $24     /* caller saved */
#define t9      $25
#define jp      $25     /* PIC jump register */
#define k0      $26     /* kernel scratch */
#define k1      $27
#define gp      $28     /* global pointer */
#define sp      $29     /* stack pointer */
#define fp      $30     /* frame pointer */
#define s8		$30		/* same like fp! */
#define ra      $31     /* return address */
2.3 start.S
这是源码:
#include <asm/regdef.h>
#include <asm/cp0regdef.h>
#include <asm/asm.h>


			.section .data.stk
KERNEL_STACK:
			.space 0x8000


			.text
LEAF(_start) 			/*LEAF is defined in asm.h and LEAF functions don't call other functions*/
	.set	mips2
	.set	reorder

	/* Disable interrupts */
	mtc0	zero, CP0_STATUS

	/* Disable watch exception. */
	mtc0    zero, CP0_WATCHLO
	mtc0    zero, CP0_WATCHHI

	/* disable kernel mode cache */
	mfc0	t0, CP0_CONFIG
	and		t0, ~0x7
	ori		t0, 0x2
	mtc0	t0, CP0_CONFIG

	/*
		To do:
  		set up stack
  		you can reference the memory layout in the include/mmu.h
	*/

loop:
	j		loop
	nop
END(_start)            /*the function defined in asm.h*/
2.3.1 伪指令补充
set,如注释所言
/*.set is used to instruct how the assembler works and control the order of instructions */
     .set	mips2
	.set	reorder
2.3.2 协处理器状态
关于设置协处理器装填,有
/* Disable interrupts */
mtc0	zero, CP0_STATUS
该条指令将CP0_STATUS寄存器的所有可写位置零。
所以将该寄存器置零的主要作用是:禁用所有中断
mtc0    zero, CP0_WATCHLO
mtc0    zero, CP0_WATCHHI
在R30XX系列处理器中并没有实现这两个寄存器。查阅MIPS32文档,这两个寄存器实现的是调试功能,置零表示禁用调试功能。
/* disable kernel mode cache */
mfc0	t0, CP0_CONFIG
and		t0, ~0x7
ori		t0, 0x2
mtc0	t0, CP0_CONFIG
查阅MIPS32文档,该操作将config寄存器的低三位置为010.低三位叫做K0域,控制kseg0的可缓存性与一致性属性。置为010代表uncached,即不经过cache。
2.3.3 其他代码分析
其实让我们干的只有这件事
/*
To do:
set up stack
you can reference the memory layout in the include/mmu.h
*/
lui		sp, 0x8040
jal		main
由内存图可以知道,只要把栈指针设置成 0x8040_0000 然后跳到 main 就可以了。
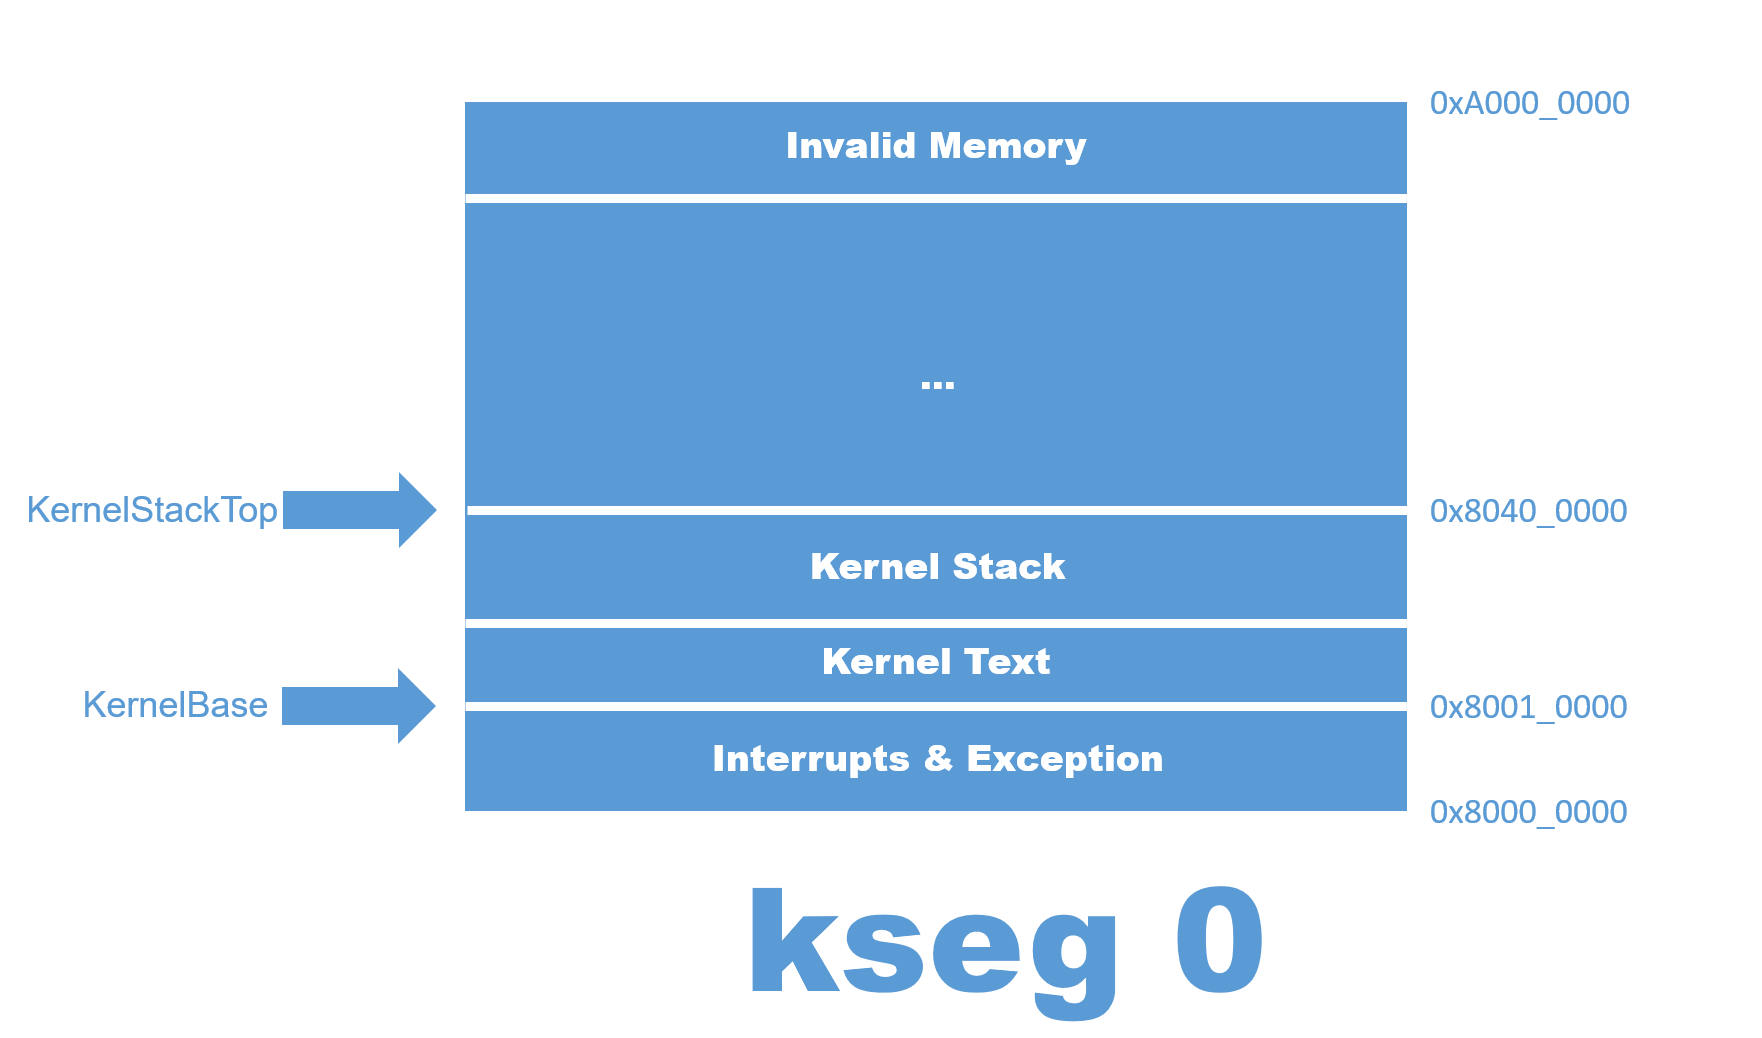
后面还有一个经典的刻意死循环
loop:
	j		loop
然后对于这段代码,我没看懂
			.section .data.stk
KERNEL_STACK:
			.space 0x8000
我问叶哥哥,叶哥哥说没用,似乎重构的时候把他删了也不影响。
总的来说,这个文件里存了用汇编语言实现的 _start 这个函数。这个函数的功能是设置 CP0 和栈指针,然后跳到 main 中。
三、printf 部分
3.1 console.c dev_cons.h
dev_cons.h 中定义了一些常量,这些常量会在 console.c 中被用到(从注释角度来看,应该是不止这个文件会用到),下面是源代码
#ifndef	TESTMACHINE_CONS_H
#define	TESTMACHINE_CONS_H

/*
 *  Definitions used by the "cons" device in GXemul.
 *
 *  $Id: dev_cons.h,v 1.2 2006/07/05 05:38:36 debug Exp $
 *  This file is in the public domain.
 */


//#define	DEV_CONS_ADDRESS		0x180003f8
#define	    DEV_CONS_ADDRESS		0x10000000
#define	    DEV_CONS_LENGTH			0x0000000000000020
#define	    DEV_CONS_PUTGETCHAR		0x0000
#define	    DEV_CONS_HALT		    0x0010


#endif	/*  TESTMACHINE_CONS_H  */
console.c 的源码如下
/*
 *  $Id: hello.c,v 1.3 2006/05/22 04:53:52 debug Exp $
 *
 *  GXemul demo:  Hello World
 *
 *  This file is in the Public Domain.
 */

#include "dev_cons.h"

/*  Note: The ugly cast to a signed int (32-bit) causes the address to be
	sign-extended correctly on MIPS when compiled in 64-bit mode  */
#define	PHYSADDR_OFFSET		((signed int)0xA0000000)


#define	PUTCHAR_ADDRESS		(PHYSADDR_OFFSET +		\
				DEV_CONS_ADDRESS + DEV_CONS_PUTGETCHAR)
#define	HALT_ADDRESS		(PHYSADDR_OFFSET +		\
				DEV_CONS_ADDRESS + DEV_CONS_HALT)


void printcharc(char ch)
{
	*((volatile unsigned char *) PUTCHAR_ADDRESS) = ch;
}

void halt(void)
{
	*((volatile unsigned char *) HALT_ADDRESS) = 0;
}


void printstr(char *s)
{
	while (*s)
		printcharc(*s++);
}
首先对它的三个宏进行分析
#define	PHYSADDR_OFFSET		((signed int)0xA0000000)

#define	PUTCHAR_ADDRESS		(PHYSADDR_OFFSET + DEV_CONS_ADDRESS + DEV_CONS_PUTGETCHAR)
#define	HALT_ADDRESS		(PHYSADDR_OFFSET + DEV_CONS_ADDRESS + DEV_CONS_HALT)
从这三个宏(以及上面那个头文件中的宏),我们可以得出 PUTCHAR_ADDRESS 的值是 0xB000_000,HALT_ADDRESS 的值是 0xB000_0010。他们都是虚拟地址。这个地址是很符合常理的,因为这俩地址都属于 kseg1,是留给外设的。唯一需要吐槽的就是 PHYSADDR_OFFSET 这个名字是错的。
然后我们来看一下函数 printcharc
void printcharc(char ch)
{
	*((volatile unsigned char *) PUTCHAR_ADDRESS) = ch;
}
前面的 volatile 是一个关键字,它提醒编译器它后面所定义的变量随时都有可能改变,因此编译后的程序每次需要存储或读取这个变量的时候,都会直接从变量地址中读取数据。如果没有volatile关键字,则编译器可能优化读取和存储,可能暂时使用寄存器中的值,如果这个变量由别的程序更新了的话,将出现不一致的现象。
然后我们看出就是它往内存中某个特定地址中写了一个字符,这个内存刚好对应外设,所以可以在屏幕上输出(或者其他的,我不清楚具体哪个外设)。
halt 函数也类似,都是往一个特殊的地址中写了个数据
void halt(void)
{
	*((volatile unsigned char *) HALT_ADDRESS) = 0;
}
printstr 就是连续调用 printcharc
void printstr(char *s)
{
	while (*s)
		printcharc(*s++);
}
3.2 printf.c
源码:
#include <printf.h>
#include <print.h>
#include <drivers/gxconsole/dev_cons.h>

void printcharc(char ch);

void halt(void);

static void myoutput(void *arg, char *s, int l)
{
    int i;

    // special termination call
    if ((l == 1) && (s[0] == '\0'))
        return;

    for (i = 0; i < l; i++)
    {
        printcharc(s[i]);
        if (s[i] == '\n')
            printcharc('\n');
    }
}

void printf(char *fmt, ...)
{
    va_list ap;
    va_start(ap, fmt);
    lp_Print(myoutput, 0, fmt, ap);
    va_end(ap);
}

void _panic(const char *file, int line, const char *fmt, ...)
{
    va_list ap;

    va_start(ap, fmt);
    printf("panic at %s:%d: ", file, line);
    lp_Print(myoutput, 0, (char *)fmt, ap);
    printf("\n");
    va_end(ap);

    for (;;);
}
首先分析 myoutput
static void myoutput(void *arg, char *s, int l)
{
    int i;

    // special termination call
    if ((l == 1) && (s[0] == '\0'))
        return;

    for (i = 0; i < l; i++)
    {
        printcharc(s[i]);
        if (s[i] == '\n')
            printcharc('\n');
    }
}
因为有 static 关键字,所以只在本文件可见,所以在调用的时候,用了函数指针的操作。奇怪的是,第一个参数 arg 并没有用到,这个在真正调用的时候,传入的是 0。我不太能理解为啥。后面的参数 s 就是需要打印的字符串,l 是字符串的长度,可以看到,就是用一个 for 循环去调用 printcharc 很好理解。
其次分析 printf
void printf(char *fmt, ...)
{
    va_list ap;
    va_start(ap, fmt);
    lp_Print(myoutput, 0, fmt, ap);
    va_end(ap);
}
因为指导书里介绍过了可变参数列表的内容,这里不再介绍,所以这个函数很显然,而且参数就是我们知道的参数。
最后分析 _panic
void _panic(const char *file, int line, const char *fmt, ...)
{
    va_list ap;

    va_start(ap, fmt);
    printf("panic at %s:%d: ", file, line);
    lp_Print(myoutput, 0, (char *)fmt, ap);
    printf("\n");
    va_end(ap);

    for (;;);
}
在这次作业中没有涉及,但是可以查到他的用处
用于显示内核错误信息并使系统进入死循环
结合这个作用来看,还挺自然的。
3.3 print.c
源码如下:
#include <print.h>

/* macros */
#define IsDigit(x) (((x) >= '0') && ((x) <= '9'))
#define Ctod(x) ((x) - '0')

/* forward declaration */
extern int PrintChar(char *, char, int, int);
extern int PrintString(char *, char *, int, int);
extern int PrintNum(char *, unsigned long, int, int, int, int, char, int);

/* private variable */
static const char theFatalMsg[] = "fatal error in lp_Print!";

/* -*-
 * A low level printf() function.
 */
void lp_Print(void (*output)(void *, char *, int),
			  void *arg,
			  char *fmt,
			  va_list ap)
{

#define OUTPUT(arg, s, l)                                                     	\
	{                                                                         	\
		if (((l) < 0) || ((l) > LP_MAX_BUF))                                  	\
		{                                                                 		\
			(*output)(arg, (char *)theFatalMsg, sizeof(theFatalMsg) - 1); 		\
			for (;;);                                                           \
		}                                                                 		\
		else 																	\
		{                                                                     	\
			(*output)(arg, s, l);                                             	\
		}                                                                     	\
	}

	char buf[LP_MAX_BUF];

	char c;
	char *s;
	long int num;

	int longFlag;
	int negFlag;
	int width;
	int prec;
	int ladjust;
	char padc;

	int length;


		fmt++;
	} /* for(;;) */

	/* special termination call */
	OUTPUT(arg, "\0", 1);
}

/* --------------- local help functions --------------------- */
int PrintChar(char *buf, char c, int length, int ladjust)
{
	int i;

	if (length < 1)
		length = 1;
	if (ladjust)
	{
		*buf = c;
		for (i = 1; i < length; i++)
			buf[i] = ' ';
	}
	else
	{
		for (i = 0; i < length - 1; i++)
			buf[i] = ' ';
		buf[length - 1] = c;
	}
	return length;
}

int PrintString(char *buf, char *s, int length, int ladjust)
{
	int i;
	int len = 0;
	char *s1 = s;
	while (*s1++)
		len++;
	if (length < len)
		length = len;

	if (ladjust)
	{
		for (i = 0; i < len; i++)
			buf[i] = s[i];
		for (i = len; i < length; i++)
			buf[i] = ' ';
	}
	else
	{
		for (i = 0; i < length - len; i++)
			buf[i] = ' ';
		for (i = length - len; i < length; i++)
			buf[i] = s[i - length + len];
	}
	return length;
}

int PrintNum(char *buf, unsigned long u, int base, int negFlag,
			 int length, int ladjust, char padc, int upcase)
{
	/* algorithm :
     *  1. prints the number from left to right in reverse form.
     *  2. fill the remaining spaces with padc if length is longer than
     *     the actual length
     *     TRICKY : if left adjusted, no "0" padding.
     *		    if negtive, insert  "0" padding between "0" and number.
     *  3. if (!ladjust) we reverse the whole string including paddings
     *  4. otherwise we only reverse the actual string representing the num.
     */

	int actualLength = 0;
	char *p = buf;
	int i;

	do
	{
		int tmp = u % base;
		if (tmp <= 9)
		{
			*p++ = '0' + tmp;
		}
		else if (upcase)
		{
			*p++ = 'A' + tmp - 10;
		}
		else
		{
			*p++ = 'a' + tmp - 10;
		}
		u /= base;
	} while (u != 0);

	if (negFlag)
	{
		*p++ = '-';
	}

	/* figure out actual length and adjust the maximum length */
	actualLength = p - buf;
	if (length < actualLength)
		length = actualLength;

	/* add padding */
	if (ladjust)
	{
		padc = ' ';
	}
	if (negFlag && !ladjust && (padc == '0'))
	{
		for (i = actualLength - 1; i < length - 1; i++)
			buf[i] = padc;
		buf[length - 1] = '-';
	}
	else
	{
		for (i = actualLength; i < length; i++)
			buf[i] = padc;
	}

	/* prepare to reverse the string */
	{
		int begin = 0;
		int end;
		if (ladjust)
		{
			end = actualLength - 1;
		}
		else
		{
			end = length - 1;
		}

		while (end > begin)
		{
			char tmp = buf[begin];
			buf[begin] = buf[end];
			buf[end] = tmp;
			begin++;
			end--;
		}
	}

	/* adjust the string pointer */
	return length;
}
3.3.1 函数指针
函数指针为什么可以存在,我觉得吴哥哥说的在理
C 是高级的汇编语言。
函数是一段代码,代码存在内存中,我们可以用指针访问内存,所以函数指针是可行的。对于函数指针,是可以讲很多的,但是因为我不会,所以就不讲了。
对于函数指针的声明,虽然有经典的一层一层分析,但是我不会写,所以就记一下好了
//函数返回值类型 (* 指针变量名) (函数参数列表);
int (*fp)(int,double);					// fp 是函数指针,第一个参数的类型是 int,第二个参数的类型是 double
int (*fpArray[])(float,char);			// fpArray 是函数指针数组
对于函数指针的赋值,我也打算记一下就好了
fp = &f;
fp = f; 	// 两种写法都可以
对于函数指针的使用
(*fp)(a,b);
fp(ab);		// 同样两种都可以
我们在代码中涉及到函数指针的,首先是这个部分
void lp_Print(void (*output)(void *, char *, int), void *arg, char *fmt, va_list ap)可以看到函数 lp_print 的第一个参数就是个函数指针,我们知道,他接受的是 myoutput 。所以在整个文件里 output 都指这个函数。
其次是这个宏
/* private variable */
static const char theFatalMsg[] = "fatal error in lp_Print!";

#define OUTPUT(arg, s, l)                                                     	\
	{                                                                         	\
		if (((l) < 0) || ((l) > LP_MAX_BUF))                                  	\
		{                                                                 		\
			(*output)(arg, (char *)theFatalMsg, sizeof(theFatalMsg) - 1); 		\
			for (;;);                                                           \
		}                                                                 		\
		else 																	\
		{                                                                     	\
			(*output)(arg, s, l);                                             	\
		}                                                                     	\
	}
这个宏其实就是用来输出的,这个宏的三个参数就是 myoutput 的三个参数。我们看到在 if 中首先看到的是错误输出语句,就是输出那句 fatal error in lp_Print! 。在 else 中才是正确语句。
3.3.2 三个私有函数
首先是 PrintChar
int PrintChar(char *buf, char c, int length, int ladjust)
{
	int i;

	if (length < 1)
		length = 1;
	if (ladjust)
	{
		*buf = c;
		for (i = 1; i < length; i++)
			buf[i] = ' ';
	}
	else
	{
		for (i = 0; i < length - 1; i++)
			buf[i] = ' ';
		buf[length - 1] = c;
	}
	return length;
}
可以看出,他大概会往 buf 中写入 _______C 或者 c_______ (下划线是空格的意思)这样的东西 ,这个写入字符串中的字符由参数 c 控制,字符串的长度由参数 length 控制,决定是空格在前还是在后,由 ladjust 控制。
然后是 PrintString
int PrintString(char *buf, char *s, int length, int ladjust)
{
	int i;
	int len = 0;
	char *s1 = s;
	while (*s1++)
		len++;
	if (length < len)
		length = len;

	if (ladjust)
	{
		for (i = 0; i < len; i++)
			buf[i] = s[i];
		for (i = len; i < length; i++)
			buf[i] = ' ';
	}
	else
	{
		for (i = 0; i < length - len; i++)
			buf[i] = ' ';
		for (i = length - len; i < length; i++)
			buf[i] = s[i - length + len];
	}
	return length;
}
这个函数实现的功能就是把字符串 s 中内容拷贝到 buf 中。同样涉及到一个左对齐还是右对齐的问题,如果 ladjust(left-adjust)大于零,那就进行左对齐,否则右对齐,里面引入了一个 len 就是为了实现这个功能(对齐补空格)。
最后是 PrintNum
int PrintNum(char *buf, unsigned long u, int base, int negFlag,
			 int length, int ladjust, char padc, int upcase)
{
	/* algorithm :
     *  1. prints the number from left to right in reverse form.
     *  2. fill the remaining spaces with padc if length is longer than
     *     the actual length
     *     TRICKY : if left adjusted, no "0" padding.
     *		    if negtive, insert  "0" padding between "0" and number.
     *  3. if (!ladjust) we reverse the whole string including paddings
     *  4. otherwise we only reverse the actual string representing the num.
     */

	int actualLength = 0;
	char *p = buf;
	int i;

	do
	{
		int tmp = u % base;
		if (tmp <= 9)
		{
			*p++ = '0' + tmp;
		}
		else if (upcase)
		{
			*p++ = 'A' + tmp - 10;
		}
		else
		{
			*p++ = 'a' + tmp - 10;
		}
		u /= base;
	} while (u != 0);

	if (negFlag)
	{
		*p++ = '-';
	}

	/* figure out actual length and adjust the maximum length */
	actualLength = p - buf;
	if (length < actualLength)
		length = actualLength;

	/* add padding */
	if (ladjust)
	{
		padc = ' ';
	}
	if (negFlag && !ladjust && (padc == '0'))
	{
		for (i = actualLength - 1; i < length - 1; i++)
			buf[i] = padc;
		buf[length - 1] = '-';
	}
	else
	{
		for (i = actualLength; i < length; i++)
			buf[i] = padc;
	}

	/* prepare to reverse the string */
	{
		int begin = 0;
		int end;
		if (ladjust)
		{
			end = actualLength - 1;
		}
		else
		{
			end = length - 1;
		}

		while (end > begin)
		{
			char tmp = buf[begin];
			buf[begin] = buf[end];
			buf[end] = tmp;
			begin++;
			end--;
		}
	}

	/* adjust the string pointer */
	return length;
}
这是把一个数拷贝到 buf 中,相当于将数字转换成字符串。我们可以指定基数,还可以指定对齐方式和前导零问题。但是就跟我们在程设中遇到的一样,是需要调转字符串的。
3.3.3 lp_Print
void lp_Print(void (*output)(void *, char *, int),
			  void *arg,
			  char *fmt,
			  va_list ap)
{
	char buf[LP_MAX_BUF];

	char c;
	char *s;
	long int num;

	int longFlag;
	int negFlag;
	int width;
	int prec;
	int ladjust;
	char padc;

	int length;

	/* special termination call */
	OUTPUT(arg, "\0", 1);
}其实我们实现的最重要功能不是打印字符串,这个功能是很好实现的。我们实现的最重要功能是格式化输出,这个功能才是实现的需求,也是难点,所以格式符形式
%[flags][width][.precision][length]specifier只要了解就可以了。